This is a small subnetting tutorial that I prepared for my students back in 2015. It explains how you can “classfully” subnet an IPv4 address space. I’ll try to put together another tutorial for classless subnetting soon.
In this tutorial, we will go through steps of subnetting a network address space using a single subnet mask. After the detailed steps, we will go through two completely solved example and three more unsolved examples for you to solve. Grab a pencil and a piece of paper and let’s go.
To start with, we will assume that you have a specific number of subnets with a specific number of hosts in each subnet. What we will do in the process of subnetting is identifying the subnet address, subnet mask, subnet broadcast address, range of available host addresses for each subnet.
Subnetting generally means using some bits of the host address to generate subnet address.
Subnetting Steps:
Step 1: Choosing the Network Address
If you were given a specific network address to use in subnetting, jump to step 2. If it is up to you to choose the network address and IP address class, you may select it based on the following steps:
- Identify the subnet with the highest number of hosts. Let’s call the highest number of hosts HiHost.
- Round HiHost+2 to the next power of 2 (ex: 2, 4, 8, 16, 32, 64..etc which is actually 21, 22, 23, 24, 25,..etc). When we say “round to the next”, it means that 17 is rounded to 32 and 5 is rounded to 8. Let’s call the result of rounding the BlockSize.
Note: We put +2 because the subnet address and the broadcast address cannot be used by hosts.
- Multiply the BlockSize by the number of required subnets. If the result is 256 or less, you can go for Class C address. If the result is higher than 28(which equals 256) but less than 216 (which equals 65,536), go for Class B. If the result is more than 216, go for Class A.
- Since subnetting mostly happens for LANs within an internal network, the addresses that we will use are in the Private ranges of each class as shown in the table:
| Address Class |
Private Range of IP addresses |
| C |
192.168.0.0 – 192.168.255.255 |
| B |
172.16.0.0 – 172.16.255.255 |
| A |
10.0.0.0 – 10.255.255.255 |
For the sake of simplicity, we usually choose 192.168.0.0 for Class C, and 172.16.0.0 for Class B.
Step 2: Choosing the Subnet Mask
Since, in our subnetting, we are planning to use only one subnet mask, we can calculate it now. The calculation is really simple.
Using the BlockSize that you have calculated in Step 1, you can find the number of bits required for host address after subnetting (Lets call it HBits) by the following calculation:
BlockSize=2HBits
This means that only HBits number of bits will be used for host addresses and the rest of the bits will be used for subnet addresses.
From that, you can easily calculate the number of bits used for subnet address (lets call it NBits) by:
NBits=32-HBits
Now can produce the subnet mask by starting (from the left) with NBits ones and HBits zeros afterwards.
For example, if NBits=20 and HBits=12
1111 1111.1111 1111.1111 0000.0000 0000
255.255.240.0
Step 3: Filling-up the Table
Now that we know the subnet mask, we will need to find the rest of the parameters (subnet address, broadcast address,…etc)
| S/N No |
S/N Address |
S/N Mask |
Broadcast Address |
Range of Host Addresses |
| 0 |
|
|
|
|
| 1 |
|
|
|
|
| 2 |
|
|
|
|
| … |
|
|
|
|
- Calculating the Subnet Address:
The first subnet address is usually the main network address. Next subnet address can be easily calculated by adding 1 to the network part of the previous subnet address. Remember to do the addition in binary, so that carry bits can be pushed to the next octet (8-bits) on the left.
For example:
The first subnet 192.168.0.0 and the subnet mask is 255.255.255.240. In binary:
| Subnet Mask (255.255.255.240) |
| 1111 1111 |
. |
1111 1111 |
. |
1111 1111 |
. |
1111 0000 |
| Network (and also the address of subnet 0, 192.168.0.0) |
Host |
| 1100 0000 |
. |
1010 1000 |
. |
0000 0000 |
. |
0000 |
0000 |
| Subnet 1 (192.168.0.16) |
| 1100 0000 |
. |
1010 1000 |
. |
0000 0000 |
. |
0001 |
0000 |
| Subnet 2 (192.168.0.32) |
| 1100 0000 |
. |
1010 1000 |
. |
0000 0000 |
. |
0010 |
0000 |
| Subnet 3, 4, 5,…. |
|
|
|
|
|
|
|
|
|
|
|
You can see in the table that the subnet addresses are calculated by adding 1 to the network-part of the previous subnet address.
- Subnet mask is the same calculated for all subnets from Step 2.
- Broadcast address of each subnet is the last address before the next subnet. In follow-up of the previous example in 1, if subnet 0 address is 192.168.0.0 and subnet 1 is 192.168.0.16, then the broadcast address of subnet 0 is 192.168.0.15.
- Usable host range is simply all addresses between the subnet address and the broadcast address. Again following-up on the previous example in 1, and 2, for subnet 0 the subnet address is 192.168.0.0 and broadcast address 192.168.0.15, then the usable host range is 192.168.0.1-192.168.0.14
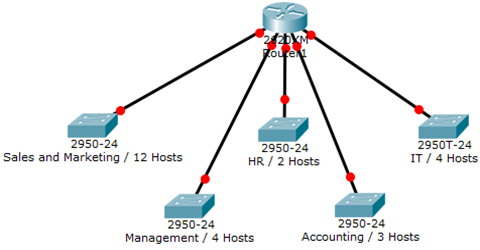
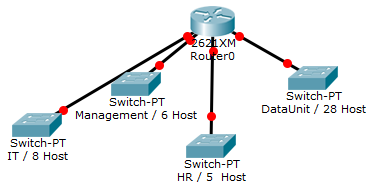
Example 1:
You have been assigned the duty of subnetting a network for an organization’s branch office. The headquarter’s IT manager said that you need to use the network address 192.168.12.0 with the default subnet mask (255.255.255.0). The number of hosts is shown in the diagram below.

Solution:
Since the main network address is already selected by the main office, we will directly start calculating the block size
HiHost=12
BlockSize= 12+2 rounded-up to the nearest power of 2.
BlockSize=16
Now we calculate the resulting subnet mask:
2HBits=16 → 2HBits=24 → HBits=4
NBits=32-4=28
Thus,
Subnet Mask is 1111 1111.1111 1111.1111 1111.1111 0000 → 255.255.255.240
Now we start calculating subnets
| Subnet Mask (255.255.255.240) |
| 1111 1111 |
. |
1111 1111 |
. |
1111 1111 |
. |
1111 0000 |
| Network (and also the address of subnet 0, 192.168.12.0) |
Host |
| 1100 0000 |
. |
1010 1000 |
. |
0000 1100 |
. |
0000 |
0000 |
| Subnet 1 (192.168.12.16) |
| 1100 0000 |
. |
1010 1000 |
. |
0000 1100 |
. |
0001 |
0000 |
| Subnet 2 (192.168.12.32) |
| 1100 0000 |
. |
1010 1000 |
. |
0000 1100 |
. |
0010 |
0000 |
| Subnet 3 (192.168.12.48) |
| 1100 0000 |
. |
1010 1000 |
. |
0000 1100 |
. |
0011 |
0000 |
| Subnet 4 (192.168.12.64) |
| 1100 0000 |
. |
1010 1000 |
. |
0000 1100 |
. |
0100 |
0000 |
|
|
|
|
|
|
|
|
|
|
|
You can clearly notice the gradual increment in the subnet address within its first part on the right while host bits remain zero all the time.
Now we start filling the table:
| S/N No |
S/N Address |
S/N Mask |
Broadcast Address |
Range of Host Addresses |
| 0 |
192.168.12.0 |
255.255.255.240 |
192.168.12.15 |
192.168.12.1 – 192.168.12.14 |
| 1 |
192.168.12.16 |
255.255.255.240 |
192.168.12.31 |
192.168.12.17 – 192.168.12.30 |
| 2 |
192.168.12.32 |
255.255.255.240 |
192.168.12.47 |
192.168.12.33 – 192.168.12.46 |
| 3 |
192.168.12.48 |
255.255.255.240 |
192.168.12.63 |
192.168.12.49 – 192.168.12.62 |
| 4 |
192.168.12.64 |
255.255.255.240 |
192.168.12.79 |
192.168.12.65 – 192.168.12.78 |
First we start inserting the Subnet addresses, and the subnet mask. Then we start using the last address in each subnet as the broadcast address. Last column to fill would be the range of host addresses which will start from the first address after the subnet address to the last address before the broadcast address.
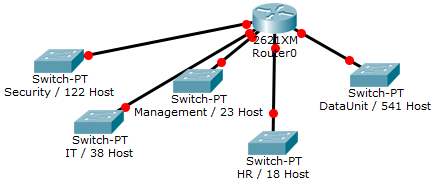
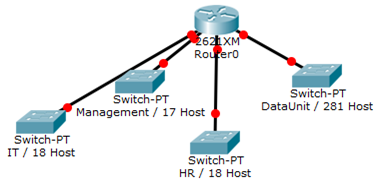
Example 2:
You have been assigned the duty of subnetting a network for an organization. The choice of class and network address is up to you. Take into consideration the host numbers mentioned in the diagram below.

Solution:
In order to make a proper network address and class choice, let us calculate the BlockSize first.
HiHost=541 → BlockSize=541+2 rounded-up to the nearest power of two= 1024
Since the BlockSize is higher than 28 and lower than 216, we will choose class B
Let the network address be 172.16.0.0 and the default subnet mask be 255.255.0.0
Now we will calculate the subnet mask after subnetting,
BlockSize=2HBits → 1024=2HBits → 210=2HBits ® HBits=10
NBits=32-10=22
The chosen subnetmask will be:
1111 1111.1111 1111.1111 1100.0000 0000 → 255.255.252.0
Now we start calculating subnets
| Subnet Mask (255.255.252.0) |
| 1111 1111 |
. |
1111 1111 |
. |
1111 11 |
00 |
. |
0000 0000 |
| Network (and also the address of subnet 0, 172.16.0.0) |
Host |
| 1010 1100 |
. |
0001 0000 |
. |
0000 00 |
00 |
. |
0000 0000 |
| Subnet 1 (172.16.4.0) |
| 1010 1100 |
. |
0001 0000 |
. |
0000 01 |
00 |
. |
0000 0000 |
| Subnet 2 (172.16.8.0) |
| 1010 1100 |
. |
0001 0000 |
. |
0000 10 |
00 |
. |
0000 0000 |
| Subnet 3 (172.16.12.0) |
| 1010 1100 |
. |
0001 0000 |
. |
0000 11 |
00 |
. |
0000 0000 |
| Subnet 4 (172.16.16.0) |
| 1010 1100 |
. |
0001 0000 |
|
0001 00 |
00 |
. |
0000 0000 |
|
|
|
|
|
|
|
|
|
|
|
You can clearly notice the gradual increment in the subnet address within its first part on the right while host bits remain zero all the time.
Now we start filling the table:
| S/N No |
S/N Address |
S/N Mask |
Broadcast Address |
Range of Host Addresses |
| 0 |
172.16.0.0 |
255.255.252.0 |
172.16.3.255 |
172.16.0.1 – 172.16.3.254 |
| 1 |
172.16.4.0 |
255.255.252.0 |
172.16.7.255 |
172.16.4.1 – 172.16.7.254 |
| 2 |
172.16.8.0 |
255.255.252.0 |
172.16.11.255 |
172.16.8.1 – 172.16.11.254 |
| 3 |
172.16.12.0 |
255.255.252.0 |
172.16.15.255 |
172.16.12.1 – 172.16.15.254 |
| 4 |
172.16.16.0 |
255.255.252.0 |
172.16.19.255 |
172.16.16.1 – 172.16.19.254 |
First we start inserting the Subnet addresses, and the subnet mask. Then we start using the last address in each subnet as the broadcast address. Last column to fill would be the range of host addresses which will start from the first address after the subnet address to the last address before the broadcast address.
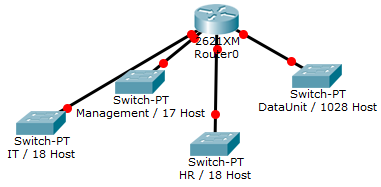
Unsolved Examples:
- You have been assigned the duty of subnetting a network for an organization. The choice of class and network address is up to you. Take into consideration the host numbers mentioned in the diagram below.

- You have been assigned the duty of subnetting a network for an organization’s branch office. The headquarter’s IT manager said that you need to use the network address 172.18.0.0 with the default subnet mask (255.255.0.0). The number of hosts is shown in the diagram below.

- You have been assigned the duty of subnetting a network for an organization. The choice of class and network address is up to you. Take into consideration the host numbers mentioned in the diagram below.